Created: February 9, 2023 9:04 AM
Created by: Luser
Type: AI
设计(基于Tensorflow Lite)
- 数据收集
- 划分数据集,得到训练集和测试集并打包成
h5格式的文件,方便调用,节省训练时间 - 构建网络
- 训练、保存模型
- 对模型进行量化编码,使其能够部署到微控制器上,由于
openmv只能跑int8模型,所以量化为int8格式(量化的具体概念我会在稍后要写的一篇论文阅读笔记里做详细说明) - 将压缩好的模型部署到微控制器也就是
openmv上并实际测试。 - 模型优化(后续再进行)
数据收集
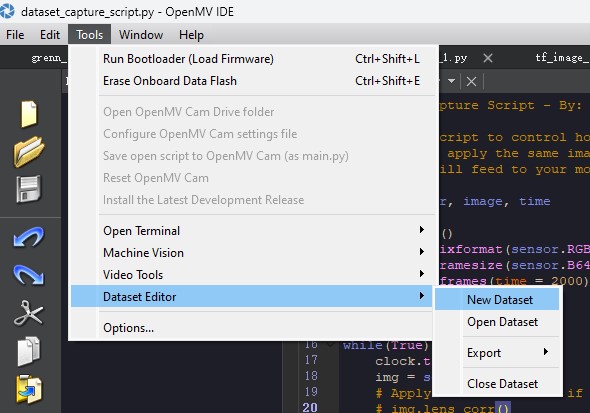
直接使用openmv的自带数据集收集功能进行采集,由于只是一次简单的测试实验,为了加快实验速度,我只采用了64 × 64格式大小的图片进行采集。具体操作如图,选中之后可以在任意位置新建一个文件夹再选择打开。

由于我要建立的模型分辨的状态只有两种,也就是戴口罩和没戴口罩,所以我在数据集文件夹下新建两个名为mask和nonmask的文件夹,分别用来保存戴口罩和没戴口罩的图片。如图,openmv会自动生成如下,文件夹的.class部分可以任意删除,因为我是自己建模型自己训练,并不需要它。

连接openmv,运行用来收集数据的例程,将带口罩的不戴口罩的图片分别存储在两个文件夹中,注意我只需要收集64 × 64格式大小的图片,所以修改一下例程拍摄的图片格式为B64X64:

我各拍摄了两百张我戴口罩和没戴口罩的照片用于训练和测试,需要说明的是因为数据集里只有我的照片并且场景也没有切换,这个网络模型对其它场景和其他人的分类效果基本没有。如果想要提高网络的分类能力肯定是需要采集不同场景下不同人物的大量的数据的。当然这里只是实现思路,关系不大。
划分数据集
划分数据集的方案我在半年前初学深度学习的时候就有了解过,当时还是用爬虫爬网上的数据然后来训练。我就直接把当时的代码改改直接拿来用了:
import os
from PIL import Image
import numpy as np
import h5py

def get_files(file_dir):
        mask = []
        label_mask = []
        nonmask = []
        label_nonmask = []


        for file in os.listdir(file_dir+'mask'):
                mask.append(file_dir +'mask'+'/'+ file)
                label_mask.append(1)     #添加标签

        for file in os.listdir(file_dir+'nonmask'):
                nonmask.append(file_dir +'nonmask'+'/'+file)
                label_nonmask.append(0)


        #把所有数据集进行合并
        image_list = np.hstack((mask, nonmask))
        label_list = np.hstack((label_mask, label_nonmask))

        #利用shuffle打乱顺序
        temp = np.array([image_list, label_list])
        temp = temp.transpose()
        np.random.shuffle(temp)

        #从打乱的temp中再取出list(img和lab)
        image_list = list(temp[:, 0])
        label_list = list(temp[:, 1])
        label_list = [int(i) for i in label_list]

        return  image_list,label_list
        #返回两个list 分别为图片文件名及其标签  顺序已被打乱

train_dir = ''
image_list,label_list = get_files(train_dir) #赋值

imgsize = [64, 64]
shape1 = imgsize[0]
shape2 = imgsize[1]

#划分训练和测试
Train_image =  np.random.rand(len(image_list)-60, shape1, shape2, 3).astype('float32')#维度为(m_train,num_px1,num_px2,3)的numpy数组
Train_label = np.random.rand(len(image_list)-60, 1).astype('float32')#维度为(m_train,1)的numpy数组

Test_image =  np.random.rand(60, shape1, shape2, 3).astype('float32')#维度为(m_test,num_px1,num_px2,3)的numpy数组
Test_label = np.random.rand(60, 1).astype('float32')#维度为(m_test,1)的numpy数组

for i in range(len(image_list)-60):
    train_img = Image.open(image_list[i]).convert("RGB").resize((shape2, shape1))#加载图片,将图片转为RGB三通道图片,将图片压缩为shape2×shape1的图片
    Train_image[i] = np.array(train_img)
    Train_label[i] = np.array(label_list[i])

for i in range(len(image_list)-60, len(image_list)):
    test_img = Image.open(image_list[i]).convert("RGB").resize((shape2, shape1))
    Test_image[i+28-len(image_list)] = np.array(test_img)
    Test_label[i+28-len(image_list)] = np.array(label_list[i])

#写入为h5
f = h5py.File('maskvnonmask.h5', 'w')
f.create_dataset('X_train', data=Train_image)
f.create_dataset('y_train', data=Train_label)
f.create_dataset('X_test', data=Test_image)
f.create_dataset('y_test', data=Test_label)
f.close()
其实就是一点文件和图像处理的操作,最后得到的X维度和Y维度能够和自己的网络模型对的上就好了,我也写了很多注释,就不多加赘述了。
构建网络模型
先编写加载数据集的函数:
def load_files():
    train_dataset = h5py.File('dataset/maskvnonmask.h5', 'r')

    train_set_x_orig = np.array(train_dataset['X_train'][:]) #  train set features
    train_set_y_orig = np.array(train_dataset['y_train'][:]).T #  train set labels

    test_set_x_orig = np.array(train_dataset['X_test'][:]) #  train set features
    test_set_y_orig = np.array(train_dataset['y_test'][:]).T #  train set labels

    train_dataset.close()
    train_set_y_orig = train_set_y_orig.reshape((train_set_y_orig.shape[1], 1))
    test_set_y_orig = test_set_y_orig.reshape((test_set_y_orig.shape[1], 1))

    return train_set_x_orig, train_set_y_orig, test_set_x_orig, test_set_y_orig
然后是定义图片种类数、输入维度、加载数据集、标准化、转换为二进制矩阵
num_classes = 2
input_shape = (64, 64, 3)

# load datasets
x_train, y_train, x_test, y_test = load_files()

# Scale images to the [0, 1] range
x_train = x_train.astype("float32") / 255
x_test = x_test.astype("float32") / 255
print("x_train shape:", x_train.shape)
print(x_train.shape[0], "train samples")
print(x_test.shape[0], "test samples")

# convert class vectors to binary class matrices
y_train = keras.utils.to_categorical(y_train, num_classes)
y_test = keras.utils.to_categorical(y_test, num_classes)
接着构建网络结构
model = keras.Sequential(
    [
        keras.Input(shape=input_shape),
        layers.Conv2D(32, kernel_size=(3, 3), activation="relu"),
        layers.MaxPooling2D(pool_size=(2, 2)),
        layers.Conv2D(64, kernel_size=(3, 3), activation="relu"),
        layers.MaxPooling2D(pool_size=(2, 2)),
        layers.Flatten(),
        layers.Dropout(0.5),
        layers.Dense(num_classes, activation="softmax"),
    ]
)

model.summary()
训练、保存模型
batch_size = 4
epochs = 15

model.compile(loss="categorical_crossentropy", optimizer="adam", metrics=["accuracy"])

model.fit(x_train, y_train, batch_size=batch_size, epochs=epochs, validation_split=0.1)

#测试模型
model.evaluate(x_test, y_test)

#keras保存模型
model.save('model/h5/maskvnonmask.h5')

# tensorflow模型保存
save_path = "model/pbpath"#pb模型保存路径
model.save(save_path)
模型量化
train_images = x_train
train_images.shape[2]

#int8量化
def representative_data_gen():
    for image in train_images[0:100,:,:]:
        yield[image.reshape(-1,train_images.shape[1],train_images.shape[2],3).astype("float32")]

converter = tf.lite.TFLiteConverter.from_keras_model(model)
converter.optimizations = [tf.lite.Optimize.DEFAULT]
converter.representative_dataset = representative_data_gen

# 确保量化操作不支持时抛出异常
converter.target_spec.supported_ops = [tf.lite.OpsSet.TFLITE_BUILTINS_INT8]
# 设置输入输出张量为uint8格式
converter.inference_input_type = tf.int8 #or unit8
converter.inference_output_type = tf.int8 #or unit8

tflite_model_quant = converter.convert()
#保存转换后的模型
FullInt_name = "model/maskvnonmask.tflite"
open(FullInt_name, "wb").write(tflite_model_quant)

#查看输入输出类型
interpreter = tf.lite.Interpreter(model_content=tflite_model_quant)
input_type = interpreter.get_input_details()[0]['dtype']
print('input: ', input_type)
output_type = interpreter.get_output_details()[0]['dtype']
print('output: ', output_type)
模型部署
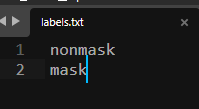
将上述步骤得到的maskvnonmask.tflite模型文件和openmv自行生成的labels.txt标签文件都放到openmv的SD卡里,编写程序调用模型。
labels.txt文件内容如下

openmv运行程序:
# Edge Impulse - OpenMV Image Classification Example

import sensor, image, time, os, tf

sensor.reset()                         # Reset and initialize the sensor.
sensor.set_pixformat(sensor.RGB565)    # Set pixel format to RGB565 (or GRAYSCALE)
sensor.set_framesize(sensor.B64X64)      # Set frame size to QVGA (320x240)
sensor.set_windowing((240, 240))       # Set 240x240 window.
sensor.skip_frames(time=2000)          # Let the camera adjust.

net = "maskvnonmask.tflite"
labels = [line.rstrip('\n') for line in open("labels.txt")]

clock = time.clock()
while(True):
    clock.tick()

    img = sensor.snapshot()

    # default settings just do one detection... change them to search the image...
    for obj in tf.classify(net, img, min_scale=1.0, scale_mul=0.8, x_overlap=0.5, y_overlap=0.5):
        print("**********\nPredictions at [x=%d,y=%d,w=%d,h=%d]" % obj.rect())
        img.draw_rectangle(obj.rect())
        # This combines the labels and confidence values into a list of tuples
        predictions_list = list(zip(labels, obj.output()))

        for i in range(len(predictions_list)):
            if predictions_list[i][1]>0.8:
                print(predictions_list[i][0])

    print(clock.fps(), "fps")
这是直接拿Edge官方生成的调用模型的程序改来的。
注意因为我训练的模型输入是64 × 64格式大小的图片,所以在最后测试的时候也必须是拍摄这个格式的视频和图片。
最后看我的测试效果:(动图加载可能需要时间)

识别到佩戴口罩时terminal中打印mask,未佩戴则打印nonmask 可见预测结果还是相当准确的。
如下是其量化前后的模型大小变化:

